1. Getting started#
Why learn Python?#
Python is among the most popular and versatile general purpose programming languages.
Common uses include:
Data Science
Application Development
AI and Machine Learning
Backend Infrastructure
Rapid Prototyping
Plotting, Mapping, Scientific Analysis
many more
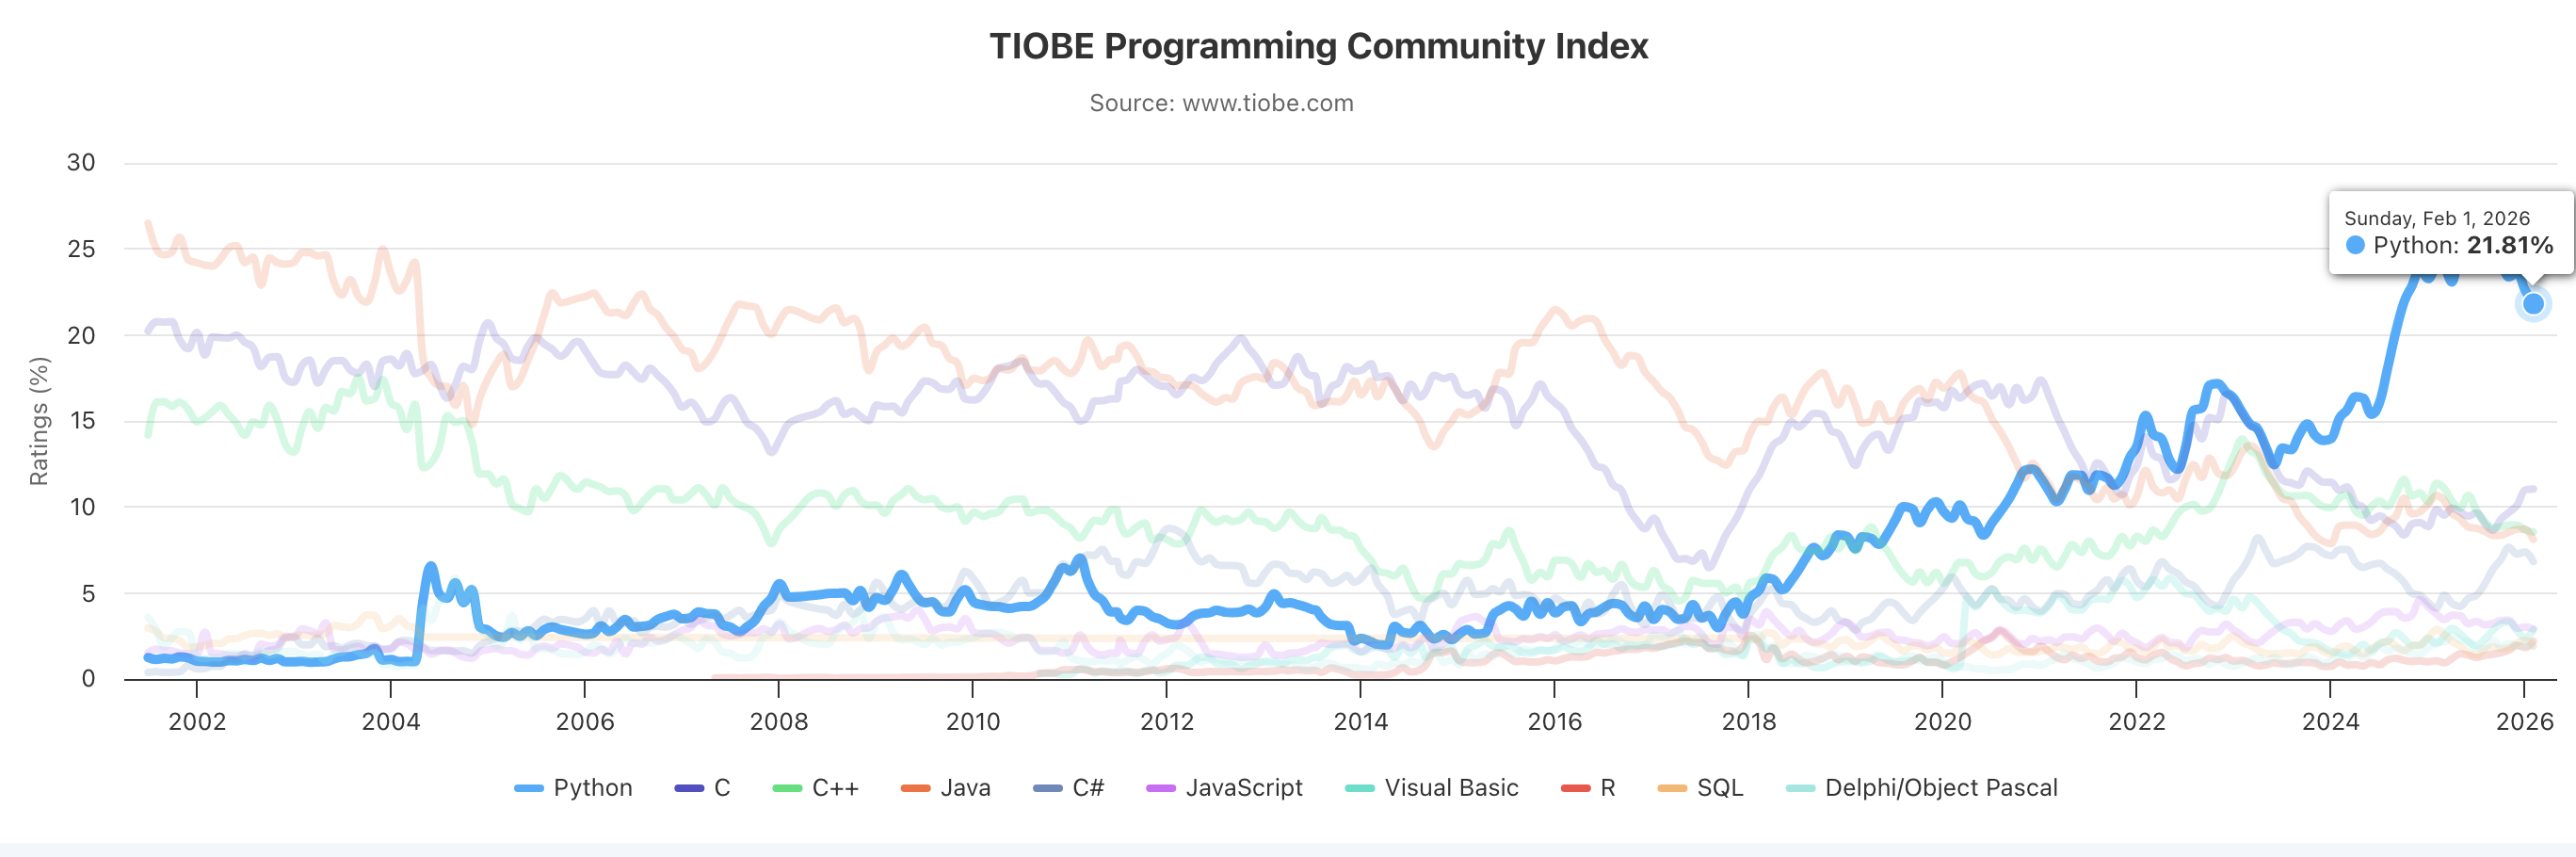
Python is the most popular language as of 2025#
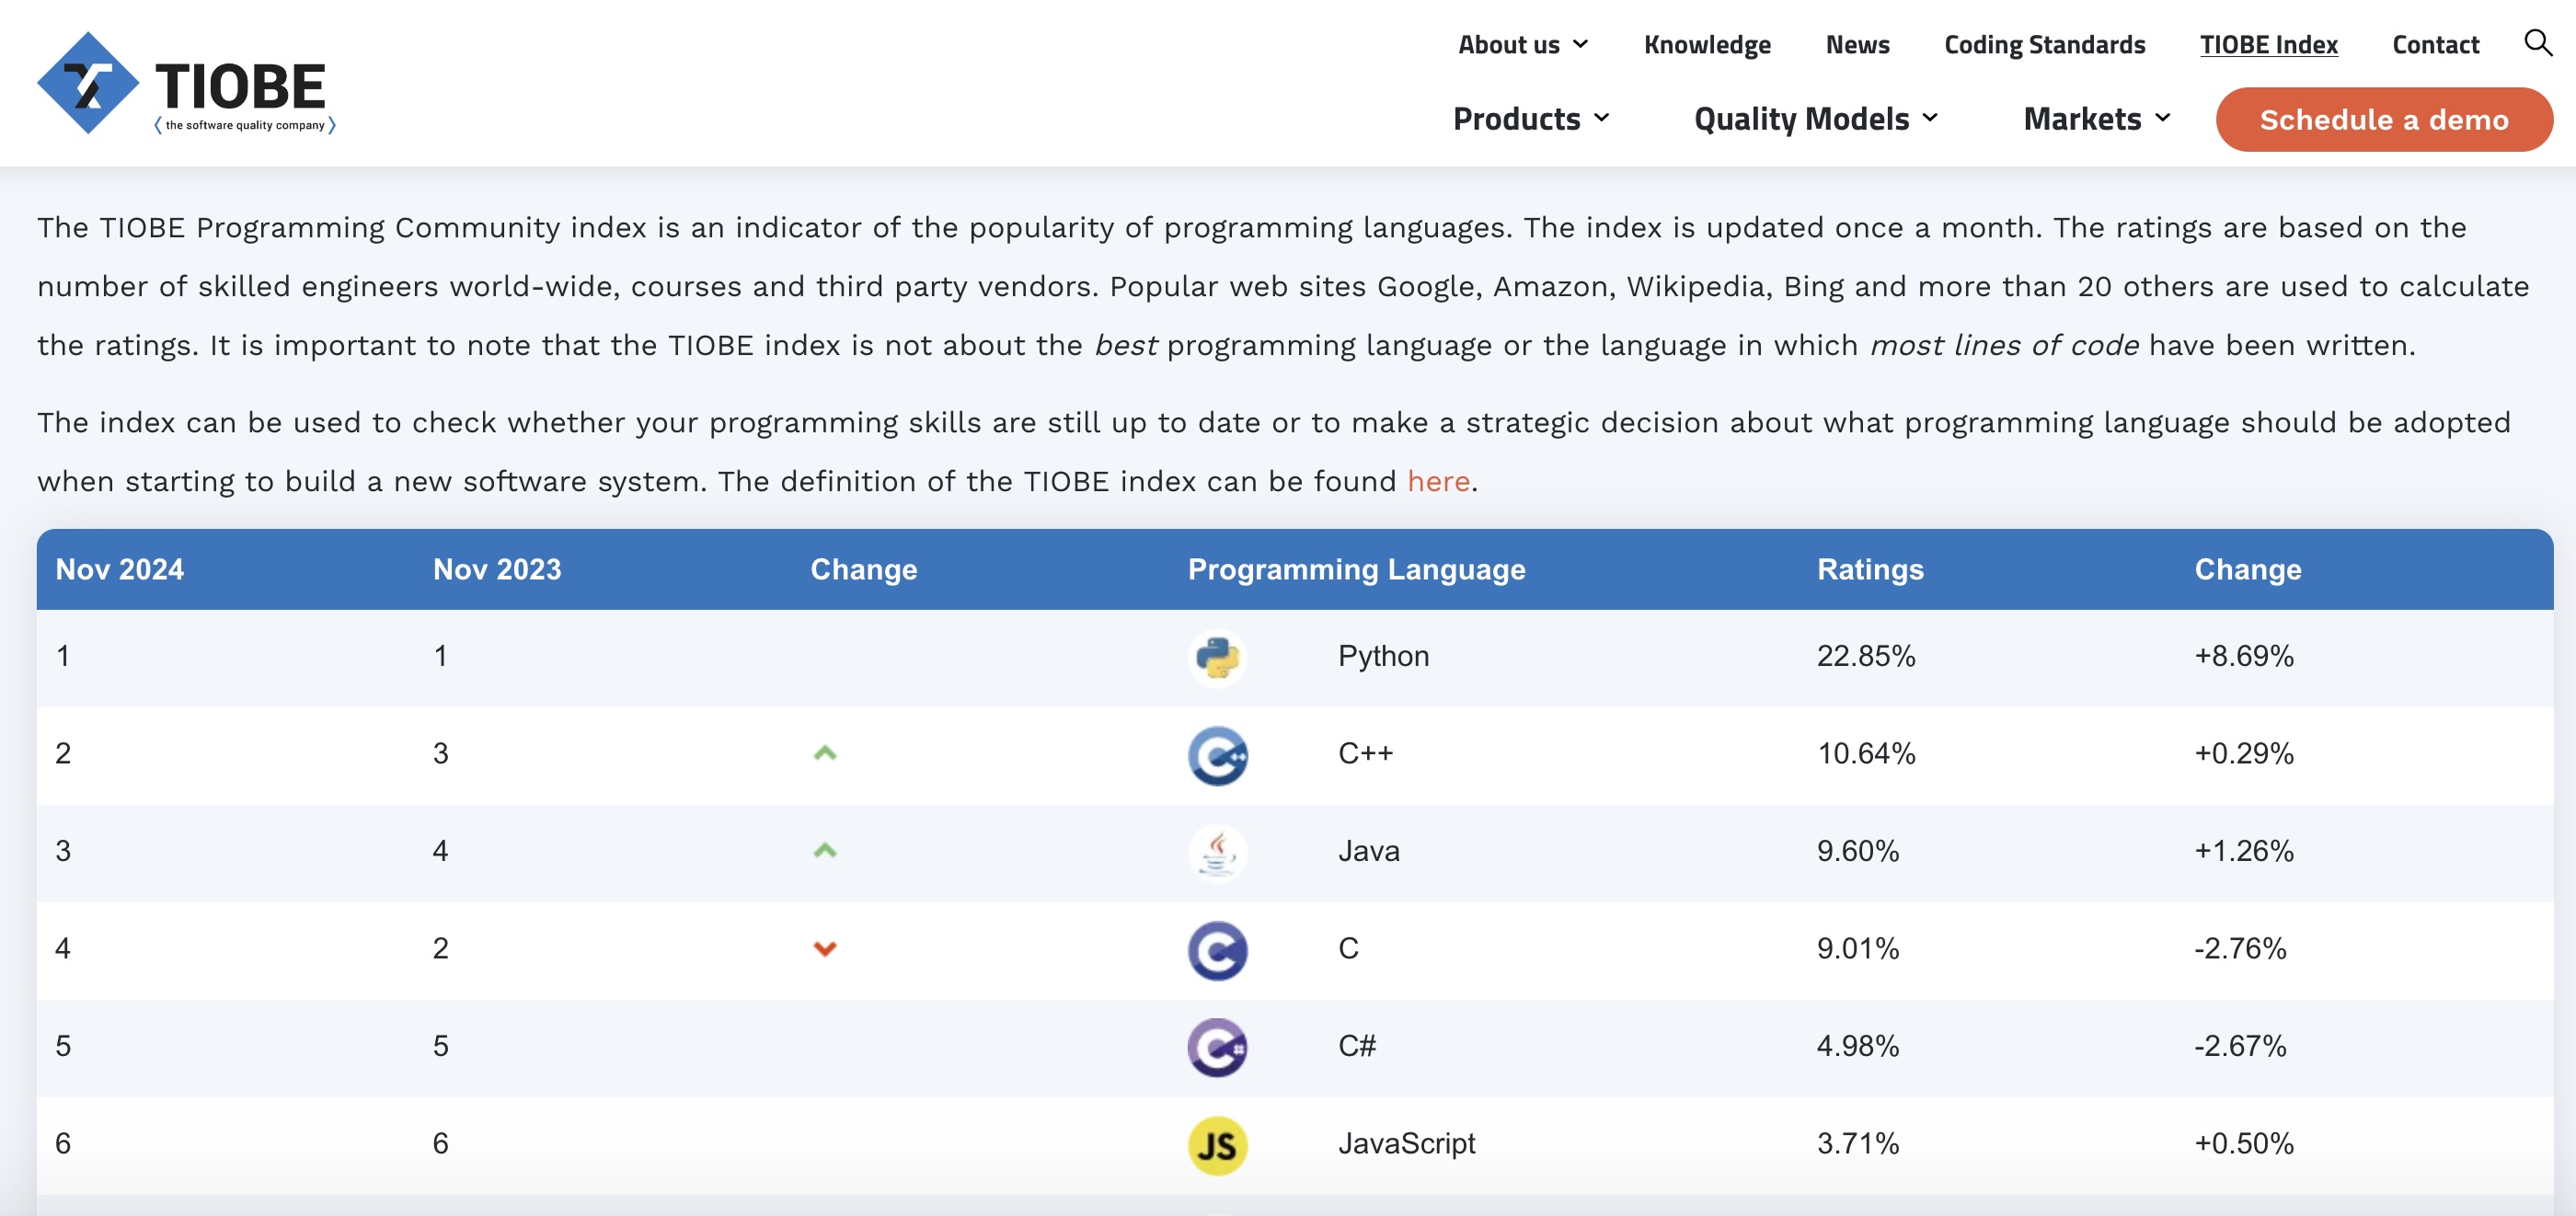
Python is in demand#
TIOBE issues an annual report of the popularity of each programming language, which shows a strong preference for python.
Python is open source#
Continuously improving through contribution
Extensible and evolving ecosystem
Powerful yet simple and elegant

import antigravity
Before diving into the wonders of python, we have to understand some of the basic tenets of computers, which we will cover in the subsequent sections.
Operating Systems#
An operating system (OS) is the software that manages a computer’s hardware and software, allowing users to interact with their device
Examples
windows
mac
linux
unix
android
ios
Command Line Interface (CLI)#
A command line interface (CLI) is a means of interacting with a computer program by inputting lines of text called commands.
It takes some getting used to, if you’ve only previously interacted with a graphical user interface (GUI) that allows users to interact with electronic devices through graphical icons and visual indicators.
But the investment is worth it!
It’s easier to send a command to a colleague, rather than instructions for how to navigate a GUI.
CLI commands can be automated: you can write a python script to control your computer!
CLI tools can be easily combined.
Many scientific/programming tools ara available only as CLIs.
Notation#
In these materials, we will use a dollar sign ($) to denote a shell command issued to a CLI.
$this is a shell command
We will use a pound sign / hashtag (#) to denote a ‘comment’ - more on that soon
#this is a comment
In these materials, you will see something like “try the command $pwd”. This means you should type pwd into your CLI, and then hit ENTER to issue the command. Generally, the command will generate some output to the CLI.
Code blocks (like the following) will also be extensively used. Note that you don’t actually type the $ before the command, or the text after the #, into the CLI.
# This is a comment, the $ on the next line is followed by a command.
$pwd
/Users/aakash/Desktop/py4wrds/01-getting-started
# the previous line was output from the pwd command
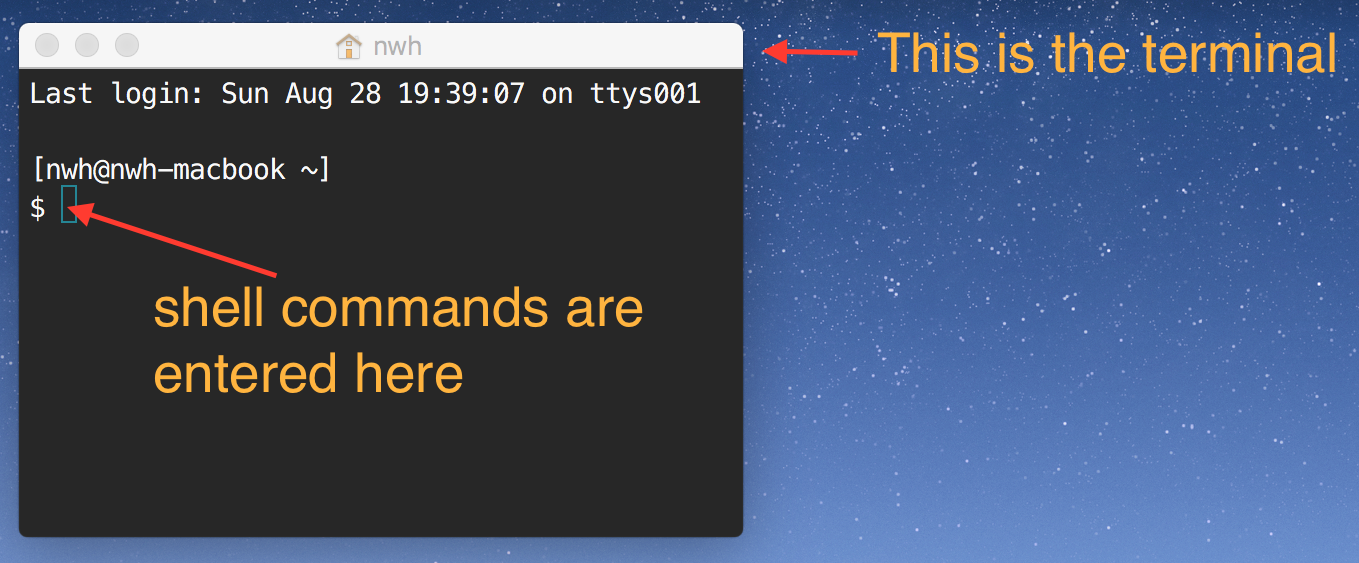
The Terminal#
A terminal, terminal emulator, or console is a program that displays text and accepts input. These programs emulate the behavior of physical computer terminals in past computing systems. Users of modern computing systems often have many terminal windows open at once. In the past, users were limited to the physical terminal they sat behind.
Windows: Windows has two builtin terminals: PowerShell and Command Prompt (aka CMD). PowerShell is newer, has more features, and shares commands with unix shells. CMD is probably still more commonly used though.
Additionally, Anaconda installs two more terminals: Anaconda PowerShell and Anaconda Command Prompt. These are the same as the “base” terminals but with conda integration. You’ll want to use these Anaconda variants whenever working with conda/python.
For this course, we will use the Anaconda PowerShell Prompt. If you’re more familiar with CMD, you may use Anaconda Command Prompt instead. CMD has slightly different commands to PowerShell (Google and LLMs work well for doing these sorts of translations).
Mac: On macOS, the built-in terminal program is called Terminal.app.
Unix: If you’re on a Unix operating system already, you likely know how to open a terminal. In Ubuntu, for example, you can simply use the keyboard shortcut Ctrl + Alt + T.
The Shell#
A shell is a program that executes commands from the user and displays the result. There are many different shell programs - bash is quite popular; it’s been around since 1989 and is the default on macOS and most Linux distributions.
A note on organization and computer hygiene#
Organizing data and files is incredibly important - be kind to your future self, and keep good computer hygiene!
My suggested directory structure for a project, located at:
/users/aakashahamed/Desktop/Projects/Drone_Project
project
│   README.md
│   file001.txt
│
└───code/
│   │   00_get_data.py
│   │   01_process_data.py
│   │
│   └───submodule/
│       │   file111.txt
│       │   file112.txt
│       │   ...
│
└───data
│   │
│   └───Source1/
│       │   file1.csv
│       │   file2.txt
│       │   ...
│       │
│   └───Source2/
│       │   file1.csv
│       │   file2.txt
│       │   ...
│
└───results
│   │
│   └───Analysis1/
│       │   file1.csv
│       │   file2.txt
│       │   ...
│       │
│   └───Analysis2/
│       │   file1.csv
│       │   file2.txt
│       │   ...
Text Files#
A text file is a sequence of characters that can be opened by any text editor. In scientific computing and data science applications, text files can be used for a variety of tasks:
Common types#
Alphanumeric characters (
.txt)Dataset storage in comma-separated value files (
.csv)Object serialization with JSON (
.json)Graphics with tools like SVG
Publication and presentation with LATEX (
.texfile extension)Tools for 3d models.
Software build systems (e.g.
GNUMakeorCMake)Music notation
One benefit of working with text files is that they can be checked into version control systems (e.g. git) and easily compared to previous versions.
It is also possible to check binary files into a version control system (e.g. .zip, .jpg, .xls, .docx), but it is not as easy to find the differences from previous versions.
Text Editors#
A text editor is a software program that lets you edit text files.
Text editors that work in a terminal include:
GUI Based text editors include:
Interacting with Python#
Python now has a long history. It started in ’89 as a project to keep Guido van Rossum occupied during the week around Christmas;
version 1.0 was released in 1994.
This class will use Python 3, which has important differences from Python2.
Python is a high level language that typically runs in an interpreter - a program that executes statements.
Examples of high level interpreted languages: Python, R, Matlab, Perl, JavaScript
The Interpreter#
An interpreter is a program that reads and executes commands.
It is also sometimes called a REPL or read-evaluate-print-loop.
One way to interact with Python is to use the interpreter.
This is useful for interactive work, learning, and simple testing.
Remember: when you see a
$in code blocks, it typically indicates a shell command. For example:
     $ls -1 *.txt
     file1.txt
     file2.txt
     file3.txt
A
>>>in code blocks signifies a command for the Python interpreter.The basic Python interpreter is good for simple computations or checks.
IPython provides more functionality (e.g. tab completion, syntax highlighting)
Try typing
$ ipython3into the CLI
Python as a calculator#
Open Anaconda PowerShell prompt and type python in the shell to launch the interpreter
You should see something like the following:
Python 3.12.7 | packaged by Anaconda, Inc. | (main, Oct  4 2024, 08:22:19) [Clang 14.0.6 ] on darwin
Type "help", "copyright", "credits" or "license" for more information.
>>>
Note that the >>> means you are ready to issue a python command.
Try the following in the python interpreter:
>>> 4+7
11
>>> 12*3
36
>>> 8-3.4
4.6
>>> 5/3
1.6666666666666667
>>> 5//3 #floor division
1
>>> -5//3
-2
>>> 5.0/3
1.6666666666666667
>>> 5.0//3
1.0
>>> 5%3
2
Anything Surprising?#
Division between two integers with
/returns a floating point number.The operator
//performs floor division (rounds down).The
%(modulus) operator returns the remainder for integer division.
Integers and floating point numbers#
This will be discussed in more detail in later modules, while these data types and operators sound trivial, they matter - bad numerical computing has resulted in multiple disasters.
Exiting the python interpreter#
Simply type exit() in the interpreter:
$python
Python 3.12.7 | packaged by Anaconda, Inc. | (main, Oct  4 2024, 08:22:19) [Clang 14.0.6 ] on darwin
Type "help", "copyright", "credits" or "license" for more information.
>>> exit
Use exit() or Ctrl-D (i.e. EOF) to exit
>>> exit()
$
Integrated Development Environments#
It is often convenient to interact with python code through an Integrated Development Environment, or IDE, which is software that provides tools and a supporting interface all within a single application, helping streamline the development process.
The main purposes and features of an IDE are:
1. Code Editing: Offers a code editor with features like syntax highlighting, autocompletion, and formatting, which help improve code readability and reduce errors.
2. Debugging: Includes built-in debugging tools that let you step through your code, set breakpoints, inspect variables, and catch errors, helping you troubleshoot issues more effectively.
3. Code Navigation: Allows easy navigation through files, classes, functions, and modules. This is particularly useful in large projects where keeping track of all files and references would be difficult otherwise.
4. Project Management: Organizes files, folders, and resources, often with version control integration (e.g., Git), so that developers can manage and collaborate on projects.
5. Environment Integration: Integrates with compilers, interpreters, and virtual environments, so developers can easily run and test their code within the IDE. Some IDEs also support package management and deployment tools.
Popular IDEs for Python include PyCharm, Visual Studio Code, and Jupyter, each offering tailored features for different types of projects and development needs.
Jupyter Notebooks / Lab:#
Jupyter is a popular IDE that we will use in this course. It started as iPython, Fernando Perez’s graduate school hobby project to make his PhD data analysis and plotting more interactive.
The Jupyter ecosystem has evolved into a set of interactive development tools commonly used in data science, machine learning, and research. They allow users to combine code, text, and multimedia (e.g., plots, images) in a single document, which is ideal for interactive data analysis and storytelling. This tutorial was created using Jupyter Notebook, which are:
Interactive: write and run code in small, manageable chunks (cells), making it easy to test and debug code line by line or section by section.
Data Visualization Friendly: integrates well with visualization libraries (e.g., Matplotlib, Seaborn), allowing users to create and display graphs within the notebook cells, making data analysis highly interactive and visual.
Documentation and Markdown Support: allows users to document their code, add explanations, and format text directly alongside their code, enhancing readability and collaboration.
Support for Multiple Languages: Through various ‘kernels’, Jupyter supports multiple programming languages including Python, R, Julia, and more
JupyterLab, the next-generation interface, allows users to work with notebooks, terminals, text editors, and file browsers all in one tabbed or split-pane layout.
Markdown#
You can leverage Markdown scripting language in jupyter notebooks to write equations with LaTeX: \(\chi = \omega * \dot \pi \)
Or denote code like $python script.py
Or leave comments and documentation #This is a comment
Markdown files (.Md) can be easily published on the web with Jupyter (this tutorial is one such example), and/or distributed as PDFs
Installation#
Conda is already installed in the py4wrds environment!
But if you ever need to install it you can do so with $conda install jupyterlab.
Launching Jupyter#
If you haven’t already, download and unzip the course materials, and place them in a convenient location on your computer (perhaps Documents/py4wrds).
Open Anaconda PowerShell Prompt
change directories into wherever you saved the course materials
$cd Documents/py4wrdsactivate the py4wrds conda environment:
$conda activate py4wrdsstart Jupyter Notebook:
$jupyter notebookthis will launch a ‘jupyter notebook’ in your default web browser, at the local web address:
http://localhost:8888/
Other useful jupyter commands
launch JupyterLab:
$jupyter labjupyter lab is a jupyter interface with more depth, including rendering markdown files.
list Available Jupyter Kernels:
$jupyter kernelspec listjupyter notebooks support other programming languages such ar R and Julia
Now, launch jupyter by tiping jupyter notebook into the Anaconda Prompt CLI, and open one this notebook: 1-getting-started.ipynb
Executing code in jupyter#
Jupyter organizes code into cells or blocks. You can ‘execute’ or run a block/cell of code by clicking it and pressing SHIFT+ENTER
Cells can be either code or markdown. Notice that you can easily change the type of cell from the dropdown at the top of the jupyter menu.
Also observe the other options in the jupyter menu, which should look pretty familiar from other software programs. Can you deduce what each does, and why it might be useful?
Python Scripts (.py files)#
Python files (.py suffix), known as ‘scripts’ are a convenient way of interacting with python, through a text file containing python code.
Let’s create and execute our first python script.
Open Anaconda Prompt CLI,
change directory to wherever you placed the course materials
activate the conda environment called
py4wrdslaunch jupyter notebook
Your commands might look something like this:
$cd C://Users/aakash/Desktop/py4wrds/py4wrds-main
$conda activate py4wrds
$jupyter notebook
This should open a jupyter notebook window in your browser at the web address http://localhost:8888/
From the top-right corner of the Jupyter Notebook homepage, select New > New File
This will open a text editor within your browser, and create a file named untitled.txt.
Rename this file to hello_world.py
In the text editor, type in the following python code:
print("hello world!")
Save your file.
Now, open a new Anaconda PowerShell prompt, and change directories to wherever you saved the file.
If you type $dir (or $ls) into the terminal, you should see the file we just created: hello_world.py
Run it by typing:
$python hello_world.py
What do you see?
Scripts are extensible#
Let’s write a simple Python script to compute the first n numbers in the Fibonacci Sequence.
Each number in the Fibonacci Sequence is the sum of the two previous numbers:
\(F(i) = F(i−1)+F(i−2)\) for all \(i ≥ 2. \)
Numbers F(0) to F(10) can be computed with the following Python code:
# We wish to calculate up to Fib(10).
n = 10

if n >= 0:
    fn2 = 0  # initialize second fib #
    print(fn2, end=",")

if n >= 0:
    fn1 = 1  # initialize 1st fib #
    print(fn1, end=",")

for i in range(2, n + 1):
    fn = fn1 + fn2  # Recurrence relation is f(n) = f(n-1) + f(n-2).
    print(fn, end=",")
    fn2 = fn1  # Update values for next iteration
    fn1 = fn  # ...for both f(n-2) and f(n-1).
0,1,1,2,3,5,8,13,21,34,55,
Extending for all N#
We can easily package this into a python file which accepts a number as an input, and calculates the relevant fibonacci sequence:
import sys

# We wish to calculate up to Fib(10).
n = int(sys.argv[1])

if n >=0:
    fn2=0 # initialize second fib #
    print(fn2, end = ',')

if n >=0:
    fn1=1 # initialize 1st fib #
    print(fn1, end = ',')

for i in range(2,n+1):
    fn = fn1 + fn2 # Recurrence relation is f(n) = f(n-1) + f(n-2).
    print(fn,end=',')
    fn2 = fn1 # Update values for next iteration
    fn1 = fn # ...for both f(n-2) and f(n-1).
If we save this code in a python file named fib_extend.py, we can instruct it to obtain the value of n from the command line:
$python fib_extend.py 0
0,

$python fib_extend.py 5
0, 1, 1, 2, 3, 5,

$python fib_extend.py 21
0, 1, 1, 2, 3, 5, 8, 13, 21, 34, 55, 89, 144, 233, 377, 610, 987, 1597, 2584, 4181, 6765, 10946,
Python Modules#
About Python modules:
A module is a collection of Python resources (functions, variables, objects, classes) that can be easily loaded into Python via
importstatements.Modules allow for easy code reuse and organization.
Modules allow the programmer to keep various functionality in different namespaces.
If you are familiar with MATLAB or R, you may come to Python and be confused by:
sqrt(3) # --> Yields a NameError: name 'sqrt' not defined.
The Python language does not have a built in sqrt function; this subroutine exists in the
math module.
>>>import math
>>>math.sqrt(9)
3
The python standard library#
There are a large number of modules in the Python Standard Library: https://docs.python.org/3/library/index.html
It is often useful to explore the Python documentation in the interpreter. See
>>> help(math)and>>> help(math.sqrt)from the interpreter.common stdlib helpers:
enumerate()sorted()zip()map()filter()etc…
The Print Module - Printing outputs to the interpreter#
The Python interpreter will echo the output of the last (non-assignment) statement in a code block:
1 + 1 # Echos --> 2
2
5 + 5 # Echos --> 10
10
myvar = 101 # Nothing is printed to console.
You can use the print() function if you wish to inspect the content of a variable:
a = 99
print(a)  # Echos --> 99.
99
By default, print() adds a new line character at the end for printing.
print("hi")  # These contents are ...
print("everyone")  # ... printed on two lines.
hi
everyone
This behavior can be changed by setting the end keyword parameter in the print function.
print("hi", end=" ")  # Now prints a space after "hi" instead of a newline ('\n')
print("everyone")  # The result looks like -- "hi cme211" on its own line.
hi everyone
The print() function can print several strings at once on the same line:
print("apple", "banana", "orange")
apple banana orange
The default separator is a space. This can be changed by setting the sep keyword parameter:
# Add a comma in addition to a space.
print("apple", "banana", "orange", sep=", ")
apple, banana, orange
Python strings can be “formatted” with the format method:
import math

r = 10
print("The area of a circle of radius {} is {}".format(r, math.pi * math.pow(r, 2)))
The area of a circle of radius 10 is 314.1592653589793
The curly braces ({}) get replaced by the arguments to format() in order.
Values, Types, Variables#
Values#
A value is the fundamental thing that a program manipulates or uses to perform operations. A value is data. Here is a string value.
"hello world"
'hello world'
Strings#
A string is a sequence of alphanumeric characters. It is denoted by quotes (single or double):
“This is a string”
‘this is also a string’
“this_is_also_a_string”
A docstring is instructions left in the code. It is denoted by triple quotes:
‘’’This is a docstring’’’
print("this is a string")
print("this is also string")
print("""this is a docstring""")
this is a string
this is also string
this is a docstring
Numbers#
There are two types of numerical values in python: integers (ints) and floats
Integers represent whole numbers while floats represent decimals
type(-2)
int
type(2.5)
float
Bools#
There are only two “Boolean value” - True and False
True
True
False
False
It will become obvious why we will want to use these later.
Remember - all values have a type:
Types (introduction)#
In Python there are several fundamental data types :
bool: values either True and False
str: for strings like “Hello world”
int: for integers like 1, 42, and -5
float: for floating point numbers like 96.8
use the type() function to Python to determine the data type of a value.
type(44)
int
type(83.4)
float
type(False)
bool
type("hello world")
str
Variables#
One of the most basic and powerful concepts in programming is that of a variable, which associates a name to a value.
message = "hello world!"
n = 42
e = 2.71
print(n)  # Echos 42.
42
The last expression shows its possible to print a variable. Everything after the # symbol is part of a comment that is disregarded by the interpreter.
It is almost always preferred to use variables over values.
Why?
Easier to update code
Easier to understand code (useful naming)
For example, What does the following code do:
4.2 * 3.3
13.86
Obviously, we’re multiplying two values, but what’s the purpose of the computation?
If the values are assigned to variables with meaningful names, we might have something like the following:
length = 4.2
height = 3.3
area = length * height
print(area)
13.86
Now a person reading the code has a good idea of what the values represent and what the output of the code means.
Variable naming conventions#
Variables names must start with a letter or an underscore, such as:
_underscore = "string"
underscore = 4
The remainder of your variable name may consist of letters, numbers and underscores:
password1 = "..."
n00b = math.pi
under_scores = "__"
Names are case sensitive, i.e. case_sensitive, CASE_SENSITIVE, and Case_Sensitive are all different.
Variable naming style#
One letter characters such as a, b, and c are too short and not at all descriptive (in general) for meaningful variable names.
On the other hand, something like number_of_particles_in_target_region is too long;
A better balance might be num_target_particles. This is quite important for code readability.
People think about this a lot. See: Naming stuff matters!
Variable names (and file names) should be:
machine readable (i.e., no spaces)
Human readable (m_import_clean_data.R)
Makes default ordering easy (i.e., dates are always YYYY-MM-DD)
Variable naming DON’Ts#
Don’t override builtin names in the standard library! –> Introduces errors
print(abs(-7))
abs = "some string"
print(abs(-4))
---------------------------------------------------------------------------
TypeError                                 Traceback (most recent call last)
Cell In[25], line 3
      1 print(abs(-7))
      2 abs = "some string"
----> 3 print(abs(-4))

TypeError: 'str' object is not callable
Packages#
Packages are modules that are not included with the standard library. We already saw how the standard libarary extend the functionality of “pure” python - the standard library package math can be helpful in determining \(\pi\)
import math

math.pi
3.141592653589793
Indeed, we can leverage packages for many useful programming tasks (all the way through plotting and machine learning!).
Third-party packages extend Python’s capabilities, allowing users to handle tasks like web development (Django), data science (NumPy, pandas), and more. Packages are not included in the standard library and must be installed. Package managers are a convenient way to install key packages.
Package managers#
Package Managers are tools that help manage Python packages, including installation, upgrades, and dependency handling. Generally, package managers interact with the command line interface.
Key Python package managers:
Conda#
Conda - A popular package and environment manager, particularly in scientific computing and data science.
Works well with non-Python dependencies.
Installation:
conda install package_name
Pip#
Pip - The default Python package manager, suitable for most Python packages.
Installation:
pip install package_name
Building packages from source (e.g. via .zip or .tar)#
Building Packages from Source
Sometimes, packages may not be available through package managers. In such cases, users can download source files (e.g., .zip or .tar).
Unpack the file, navigate to the directory, and run
python setup.py installto install the package manually.CAUTION - BE SURE THAT THE SOFTWARE YOU INSTALL COMES FROM A TRUSTED SOURCE!
Note: We will get an error if we try to import a package that we don’t have
import somepackage
---------------------------------------------------------------------------
ModuleNotFoundError                       Traceback (most recent call last)
Cell In[1], line 1
----> 1 import somepackage

ModuleNotFoundError: No module named 'somepackage'
Managing and distributing packages with virtual environments#
Why virtual environments#
Virtual environments are isolated Python environments, allowing for project-specific dependencies and versioning without interference.
Conda can create virtual environments for various versions of Python, isolating package versions per environment.
Best Practices#
Project-based vs. Workstream-based
Project-based environments isolate dependencies to specific projects, ideal for large projects with unique dependencies.
Workstream-based environments organize dependencies for a type of work (e.g., data science, machine learning), enabling shared setup across projects.
Distribution with Production Code
For production code, virtual environments should be configured with specific dependencies and versions to prevent deployment issues.
Distributing Environments#
Environment Files:
environment.yamlfile (Conda): Stores all environment dependencies for easy replication.requirements.txtfile (Pip): Lists the required packages and their versions for a project.
Example: Creating, Exporting, and Building an Environment#
Create and activate a virtual environment with Conda. From anaconda prompt, type:
$conda create -n py4wrds python=3.12
$conda activate py4wrds
Install Key Packages#
conda install numpy pandas matplotlib
More on these packages later.
Create a .yaml File Describing the packages contained in the Environment#
$conda env export > environment.yaml
the environment.yaml file may now be distributed to colleagues, and can be used to reproduce the environment with the following command:
$conda env create -f environment.yaml
Verification: Check that the new environment has the same packages using $conda list.
Deactivate the Environment#
$conda deactivate